Thursday, December 26, 2013

Christmas Craft

I have become a fan of Pinterest. There are so many cute ideas and things to find on that website, and I find myself just pinning away sometimes! Right before December I found this very cute idea of how to make a very unique ornament that is easy, not very expensive, and also has a rustic feel to it! I also found a new blog that I've started to follow. You can see her instructions hereMamie Jane's is an awesome place to find ideas on how to decorate using items you just might have on hand, or can easily find! Anyway, take a peak over at her blog to see what she has going on. For those of you that just want to see what I made and how to make them, continue on reading! 

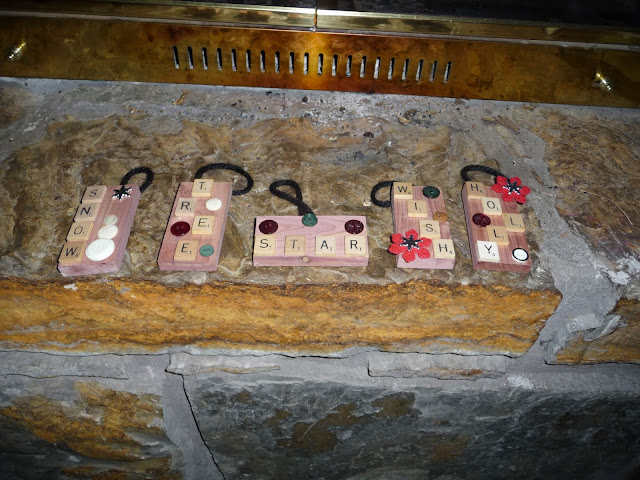
A look at the finished products.
The original blog used a few different materials, which I either didn't have, or decided not to use. Here is a list of materials that you will need to use. 

Gathered Supplies
You will need:
 Glue (I used Aileen's Tacky Glue, but white glue would probably work too)
 A bit of thick yarn
 A Staple Gun
 Embellishments (I used buttons and stick on snowflakes)
 Scissors
 Letter Tiles (I bought a big lot of Scrabble tiles on Ebay, or you can go to your local craft shop and they sell them in their wood section)
 Small blocks of wood (I cut mine to 2x4 inches, however Mamie Jane's blog used old rulers cut to the proper size)
 Sandpaper

I used some scrap cedar we had left over from a previous house project as my wood block.
If you are using a wood block like I did, check your block for the smoothest side. I used rough cut cedar wood that was left over from a project and the one side was rougher than the other. If there was a little roughness on the smooth side where I didn't want it I just sanded it a little with the sand paper. 

Staple the yarn, to the back of the wood block.
Take the yarn and cut a piece about five inches long, then fold in half and staple to the back of the wood. I also put a knot at the end of my yarn to help reinforce it with the staple. 
 
Use the sandpaper on the back of the letter tiles.
Because the Scrabble Letter tiles are smooth and shiny on the back I used a little bit of sandpaper to help it adhere to the wood better with the glue. You don't have to sand a lot, just enough to get the varnish off. 

Place a small dab of glue on the letter tile
Before you start gluing, you might want to place your letter tiles and embellishments where you want them to make sure they will fit right. With the size block I used the most letters I could get on the block was five, and that was squishing them together very close. By checking the placement before you glue you save yourself a lot of headache, trust me on this one! Using your glue, whatever type you decide to use, place a small dab of glue on the back of the letter tiles. Then place the tiles where you would like them. Once your letters are in the spot where you need them you can then glue on your embellishments. I used buttons and snowflake stickers, but there are so many options in the craft store, so go crazy, or not... LOL!

Finished Project!
When you are done, you have a cute, special ornament that you can hang on your own tree, or make a bunch and give them to friends and family! A few of mine will be going to some of my family back in PA!


Well I hope you enjoyed the craft, and maybe you'll have something special you did this year to share with me. If so, leave a comment, I love new ideas. Hope you all had a very Merry Christmas, and that the New Year will bring many blessings to you and your family!
 

Saturday, November 16, 2013

Craft Room Reveal!

Okay, so last time I was on here I showed you what my craft room looked like before we did any work on it. My husband recently checked my blog out and "yelled" at me for not posting all the hard work we (he) did in the room. Soooo... here is the pictures from the craft room update!!


Old vs new

 So the old wall color was green... not too bad, but not what I wanted. So we painted it this lovely color blue called Rhythmic Blue by Behr. The room only has one small window, and this color really brightened it up a lot! Then we added wainscoting to the bottom portion. We could have bought it in the color white, but I wanted it to be painted a special color white that I found. 

Floors being installed and walls completely painted
 The color of the wainscoting is called Swiss Coffee another Behr color. Once the white was up it really brightened up the room and I already started to feel relaxed. We also put in wood floors. I debated and debated about the color. I almost put in a white type wood color, and it would have gone nicely with the beach theme, cuz it looked like it had been painted and worn down by all the sand brought in, but I fell in love with this warm Carmel brown, and I love walking into that room now with those floors!
Tech savy stuff!
Because my family is a bunch of nerds we have to have ways to use all of our tech stuff. So on two walls we placed these ports that connect to our home network system and our phones. This wall only has two ports available right now, but we can add up to four more. The other wall has four ports available, and I'm using a lot of them... LOL! More about my nerdy house later!
An amazing fan!
 While the old fan worked, it was out dated and did not really go with the feel of the room, so I found this at Home Depot and fell in love. I love the fact that it looks like its made out of bamboo and something you would use on a porch to fan yourself with. The light is nice too! For once I'm not afraid to put my fan on high speed and fear for my life... LOL!
Cricut Center
Of course my Cricut Imagine needed a good place to stay. I'm not sure if this will be its forever home in my craft room, but for now it works very nicely. It was an old computer desk that we had, so the bottom portion is filled with albums I'm currently working on and a shelf system to hold up to five pages that I'm scrapping together. Its also placed next to our tech savy stuff so that I can plug it into our network and not its remotely connected to my computer so I can print from the Cricut Craft room without needing wires running all over my floors. (Really this was my hubs idea which was so amazing of him!)
Yarn and Paper Station
To the left of the Cricut center is my yarn and paper station. We are still working out the kinks on how to get my paper to be accessible without being a mess. The first idea of using big magazine holders did not work out well, partly because paper is heavy and the magazine holders were made out of thinner plastic. Also, since this pic was taken I have added another bin station for more yarn... I went through a bit of an obsession with yarn for awhile!
Corkboard Closet door!
I wanted to make as much space usable as possible, so using some cork board I had previously bought for something else, I hung them on my closet door with command strips. Now I can place cards I made/get, and other things on the door. As you can see its also right next to where my desk is... The command center of the room. 
The Command Center
My desk was placed in a corner, but pulled away from the wall to give access to the shelves. We are still debating about cutting the shelves so the desk can go back further, but I actually like that its pulled out from the wall and I can get to my other tech savy section of the room without pulling things away from the wall and such. Also, the cats love to sleep back there, so I actually put one of their cat beds back there. 
Shelves, shelves, and more shelves.
The shelves by my desk go all the way across the wall and I have placed my cartridges there in alphabetical order. I have added a lot more boxes and stuff to this section, but still a lot of organization needs to be done. As I find what works and what doesn't I make changes. 

So there is my Craft Room Reveal. I love the colors, the feel and oh the wonderful knowledge that I can go in there and craft away. 

Of course this isn't the only remodel we have been doing in our house. My other blog, which is dedicated to our house, our lives, and so much more has a contest going on... Check it out to win a $25 gift card from Home Depot! The House of Nerds is full of interesting things going on in my life, so go check it out and join in the contest! Hope to see you there!

Tuesday, March 5, 2013

Craft Room Re-DO!

Our House when we moved in!
When we were looking for our house back in 2010 we wanted at least three bedrooms, but would have loved a fourth because I was working from home at the time and my own office would have been great. So when we found our house we were thrilled to know that it did indeed have four bedrooms. 
For the next year or so I used the fourth bedroom as my personal office for work, and it was great. No interruptions from the rest of the household while I was busy, and I could even shut the cats out! Then I found a job in my degree of specialty (psychology), and I no longer needed my own office. This left us to wonder what we would do with it. 

Eventually, as things usually happen, my love for my crafts gave the room its new purpose, however it wasn't set up right for it.  
The desk was squeezed in the corner and covered with a mess, because I had no place to stretch out. 
In the opposite corner I have a small folding table that I use for things I'm currently working on, however its not a very sturdy table, so when I go to cut paper it moves and shifts... not the best thing when you are looking for a straight line!
 The corner with the window is smushed with temporary shelving units and my Cricut Imagine on an old printer desk! You can barely get to the closet which in itself is a disaster area (someone needs to call that place a state of emergency because it really is!).
The floor is covered in things that I placed there because there was no room for it anywhere else. Walking in that corner shown in the picture is like trying to avoid landmines... it doesn't work very well!
Finally my yarns were corralled in bins, but were not sorted very well, and if you look closely there is a bag full of yarn that didn't even make it into a bin because I ran out of bin room!  
www.hdwallpaperspics.com
My inspiration for the room's decor has been the beach! I love the relaxation I get when I think of the waves lapping against the sand, and the sand between my toes, not to mention the warm sun and cool breeze on my face. When I go to my craft room I want it to be my retreat from my boys and my life, and what better way to make it feel like that than to make it feel like a beach house. I see it all in my head, I just hope that it comes out the way I see it!

So do you have a room that you use to relax? Did you find inspiration from a place or thing to decorate that room, or even your whole house. Leave a comment about what you have done, I'd love to hear! Keep checking back for updates on Craft Room Re-DO!!!!
Sunday, January 6, 2013

New Year, New Blog

So as most of you have noticed I haven't been on my blog in a while. Part of it was because I could not get it to log in. Part of it was because I had no time to actually do any crafts, and another part of it was because I just ran out of ideas. Christmas 2012 my husband bought me a crochet kit to teach myself how to crochet. I fell in love with the whole craft and started making all kinds of things... most of them not what they were supposed to be at first, but in the end I wound up making some really cute things. This year, I decided that my blog is going to be more than just paper crafting, because while I love to paper craft, there are so many other things I love to do. So my blog will be getting revamped... It will still include paper crafts, Cricut things, and so much more of that, but it will also include yarn works and hats, blankets, scarves... so many sweet things that I have been making over the past few months. I'm also hoping to start stocking up an inventory so I can sell some of them on etsy, but we will see how that goes. So I hope that you will stick with me and hang out at the Zoo to see what I come up with and how much fun I have with all my crafting projects. See ya'll soon!!!