https://www.pinterest.com/source/sdmilitarywife.com
*as a disclaimer to the pic above, this also applies to the many men that are military spouses too!
Recently there has been a lot going on in my life and the lives of my family members. My DH is a member of the military (that's about all we'll say there for security reasons), and my son is a 16 year old who thinks mom is his personal taxi... well okay, maybe he doesn't think that, but it feels that way sometimes!
As a military spouse a lot of the time you are the "only available parent" for just about everything. Even when your spouse isn't deployed, or on TDY, or doing some sort of crazy military thing... the list goes on!
At some point in our journey as a military family I just became used to this as our norm! Not that I liked it, it just is what it is. If our son had a parent teacher conference day, I usually went alone (or didn't go at all because, lets face it, I'm busy too and sometimes things just don't happen, even when you want them too). If our son was sick and had to go to the doctor, then I was the one to make the appointment and take him. If our son wanted to hang out with his friends, I was the one to help schedule between the parents and decide who's house was going to be bombarded by teenage boys!
This week something amazing happened!!!! My husband took charge and became the "only available parent"!!!!
This is a busy week for me at work. Finals week for my high school students before we start a new block, and parent teacher conferences. I've been bogged down in spreadsheets, calls, and emails, and just plain old begging for students to finish their work. Meanwhile my son decides (like he really had a choice) to get a nasty infected ingrown toenail. It isn't the first one, and it probably won't be the last, but I had made a call for an appointment, but it was way out at the end of March (and I called in February... ugh!), but it was getting really bad and needed medical attention.
I was contemplating how I was going to pull this off this week when my husband looked at me and said... "you know there is another parent in this family!"
It took me off guard. I mean, I know he's here, but so many times he's just not available for this kind of stuff that I don't even consider asking! (Usually when I do his schedule is booked for the next five months, so I just stop asking!)
So I gratefully handed this problem over to him and let him deal with the phone calls, the referrals, and the final judgement of Urgent Care over ER visit!
It was a weird game to watch him juggle his own life, and finally find a good time to get our son seen, but he did it! (Not that I didn't think he could... its just... well I'm usually the "only available parent")
Sometimes as a mil spouse we get so used to doing things on our own, caring for the family, paying the bills, taking kids to appointments, playdates, you know... EVERYTHING... we forget that we have a partner in crime to help us. Sometimes we feel guilty because we know our spouse has just as much of a crazy schedule as ours, but it seems more important because... well the "freedom on which we sleep under" depends on them! Sometimes we just get in that super spouse mode and we forget... We Just Forget!
So take some time to remember this week... even if you aren't a military spouse... that you do have someone you can go to, ask to tag team things with, and be thankful. There are many out there who do not have that ability! Those are my heros! (Along with my husband of course!)
I'm a full time teacher at an online virtual school, who loves to craft, read, and also happens to be a military spouse. To say my life is a little crazy is just the tip of the iceberg. Follow along as I journey through this fascinating new adventure and share tips, tricks, and even some knowledge that might either help you...or at least make you laugh!
Saturday, March 12, 2016
Friday, March 11, 2016
A New Adventure, A New Life, and lots of feels!
So it has been a long time since I've posted anything new on my blog! Like... a really long time.
A lot has changed in my life... some hasn't changed! Let me see if I can get you up to date on what is going on and then we can dive a little deeper into the new direction of my blog... I hope at least!
A few years ago, after working tirelessly towards my bachelors in psychology, I realized that I was in the wrong line of work. I love psychology! Always will, but it didn't make my heart sing like I thought it would. It wasn't until my position at a Psychosocial Rehabilitation (a great big word for helping people re-enter the main stream after being diagnosed with a mental illness) that I learned I loved to teach!
I didn't jump right into working towards getting my teaching degree, because I thought, what if I just like teaching adults??? So I went to my local public school and signed up to be a substitute teacher on my days off from my regular part time job!
I ended up loving it. I quickly realized that I am not meant for elementary students (OMG... kindergarten and first grade teachers are amazing... I bow to you cuz you have it rough!). I found the most joy with Middle schoolers and High Schoolers.
I took the next leap and found a program in my state for Alternative Program Teaching Certificates. Basically, if you have a bachelors degree you can teach in your field of study. Well what would a psychology major teach in a high school... if you thought psychology you are partially right. I can teach any of the social sciences.... that is Social Studies, History, Psychology, Sociology... and the list goes on. So I started the long drawn out process of becoming a teacher. Meanwhile I found a job at the local virtual school as a counselor tech so I could get my foot in the door to the education system!
Let me tell you, that was about the best decision I ever made. It took me a year to finalize the whole process and be a certified teacher, but as soon as I had my certificate they were like, we have just the job for you... and I was thrown into the world of teaching.
I love it! There are days where I pull my hair out and wonder what I was thinking, and there are days like today where I'm exhausted and so grateful that we get Spring Break off... but mostly I love seeing my students excel, learning something and I especially love the parents that say, "You changed my child's mind about history... they love your class!"
So what is the moral of this story...
Well if you are in a job that doesn't make your heart sing... keep listening! Your heart is waiting for you to hear where it thinks you should be. And if you hear that song... don't be afraid to jump. Take precautions, like I did, but make that leap, because you never know where it will lead you!
So this is the beginning of my new blog... I'll share with you life tips, crafting tips, and of course some crazy military family stories (oh don't get me started)... and I hope you enjoy the craziness of my life as much as I have been!
A lot has changed in my life... some hasn't changed! Let me see if I can get you up to date on what is going on and then we can dive a little deeper into the new direction of my blog... I hope at least!
A few years ago, after working tirelessly towards my bachelors in psychology, I realized that I was in the wrong line of work. I love psychology! Always will, but it didn't make my heart sing like I thought it would. It wasn't until my position at a Psychosocial Rehabilitation (a great big word for helping people re-enter the main stream after being diagnosed with a mental illness) that I learned I loved to teach!
I didn't jump right into working towards getting my teaching degree, because I thought, what if I just like teaching adults??? So I went to my local public school and signed up to be a substitute teacher on my days off from my regular part time job!
I ended up loving it. I quickly realized that I am not meant for elementary students (OMG... kindergarten and first grade teachers are amazing... I bow to you cuz you have it rough!). I found the most joy with Middle schoolers and High Schoolers.
I took the next leap and found a program in my state for Alternative Program Teaching Certificates. Basically, if you have a bachelors degree you can teach in your field of study. Well what would a psychology major teach in a high school... if you thought psychology you are partially right. I can teach any of the social sciences.... that is Social Studies, History, Psychology, Sociology... and the list goes on. So I started the long drawn out process of becoming a teacher. Meanwhile I found a job at the local virtual school as a counselor tech so I could get my foot in the door to the education system!
Let me tell you, that was about the best decision I ever made. It took me a year to finalize the whole process and be a certified teacher, but as soon as I had my certificate they were like, we have just the job for you... and I was thrown into the world of teaching.
I love it! There are days where I pull my hair out and wonder what I was thinking, and there are days like today where I'm exhausted and so grateful that we get Spring Break off... but mostly I love seeing my students excel, learning something and I especially love the parents that say, "You changed my child's mind about history... they love your class!"
So what is the moral of this story...
Well if you are in a job that doesn't make your heart sing... keep listening! Your heart is waiting for you to hear where it thinks you should be. And if you hear that song... don't be afraid to jump. Take precautions, like I did, but make that leap, because you never know where it will lead you!
So this is the beginning of my new blog... I'll share with you life tips, crafting tips, and of course some crazy military family stories (oh don't get me started)... and I hope you enjoy the craziness of my life as much as I have been!
Monday, March 17, 2014
A Minon Tale!
Recently my BIL jokingly requested a hat that he could wear in the cold winter months of the east coast. Knowing that he worked out doors a lot, I knew it would have to be a ski mask or balaclava type hat, which created a little bit of a problem... I had never stitched one of these up, but how hard could it be! The other problem was that he wanted a Minion hat. Now I recently had made a couple of minion hats for my niece and nephew (which also happen to be his children), so I knew I could handle that part of it, but how to make it fit the style of a balaclava.
I searched and searched, and there aren't a lot of patterns out there for balaclava hats... and there are absolutely none for a minion balaclava hat... so now I had to do some thinking. I finally found a pattern for the balaclava portion of the hat over at 2 Crochet Hooks Etsy Store. Now all I had to do was figure out the pattern for the minion. I had a pattern that I found somewhere along the way (I wish I knew where I found it, but I can't remember. My collection of patterns is huge, so it could have been from anywhere. If you want a pattern for a minion hat go to Etsy or Ravelry and search for minion crochet... tons of them there!)
Finally after a lot of thought and consideration (go ahead and ask the BIL, this was a very long process)... I finally plunged ahead and started my project! The top part was pretty easy, I followed the pattern, but had to keep constant check on how big it was getting, thankfully my hubs was willing to try it on for me several times to check the fit!
Then I had to start the whole eye open thing. This was a little tricky, and in the end I had to go back and fill in a little bit due to the eye section being too big, but it worked out in the end!
Next came the blue of the jeans that the minions wear! That was simple enough too! However, when I got to the end of the pattern, the back of the hat hit the shoulders nicely, but the front of the neck was exposed to the air... so I decided to just go ahead and make that part longer!
My BIL also wanted it to be a little "evil", so I added a little bit of purple with a mohawk so that it looked like he was either changing to the evil minion or reverting back to the nice little minions we all love and secretly wish we had at our disposal! As you can see above, the back hits very nicely where the shoulders would meet.
The front is a little bit longer, but it works out nicely on an actual person...
All in all, I think it came out good!
I searched and searched, and there aren't a lot of patterns out there for balaclava hats... and there are absolutely none for a minion balaclava hat... so now I had to do some thinking. I finally found a pattern for the balaclava portion of the hat over at 2 Crochet Hooks Etsy Store. Now all I had to do was figure out the pattern for the minion. I had a pattern that I found somewhere along the way (I wish I knew where I found it, but I can't remember. My collection of patterns is huge, so it could have been from anywhere. If you want a pattern for a minion hat go to Etsy or Ravelry and search for minion crochet... tons of them there!)
Finally after a lot of thought and consideration (go ahead and ask the BIL, this was a very long process)... I finally plunged ahead and started my project! The top part was pretty easy, I followed the pattern, but had to keep constant check on how big it was getting, thankfully my hubs was willing to try it on for me several times to check the fit!
Then I had to start the whole eye open thing. This was a little tricky, and in the end I had to go back and fill in a little bit due to the eye section being too big, but it worked out in the end!
The front is a little bit longer, but it works out nicely on an actual person...
All in all, I think it came out good!
Thursday, December 26, 2013
Christmas Craft
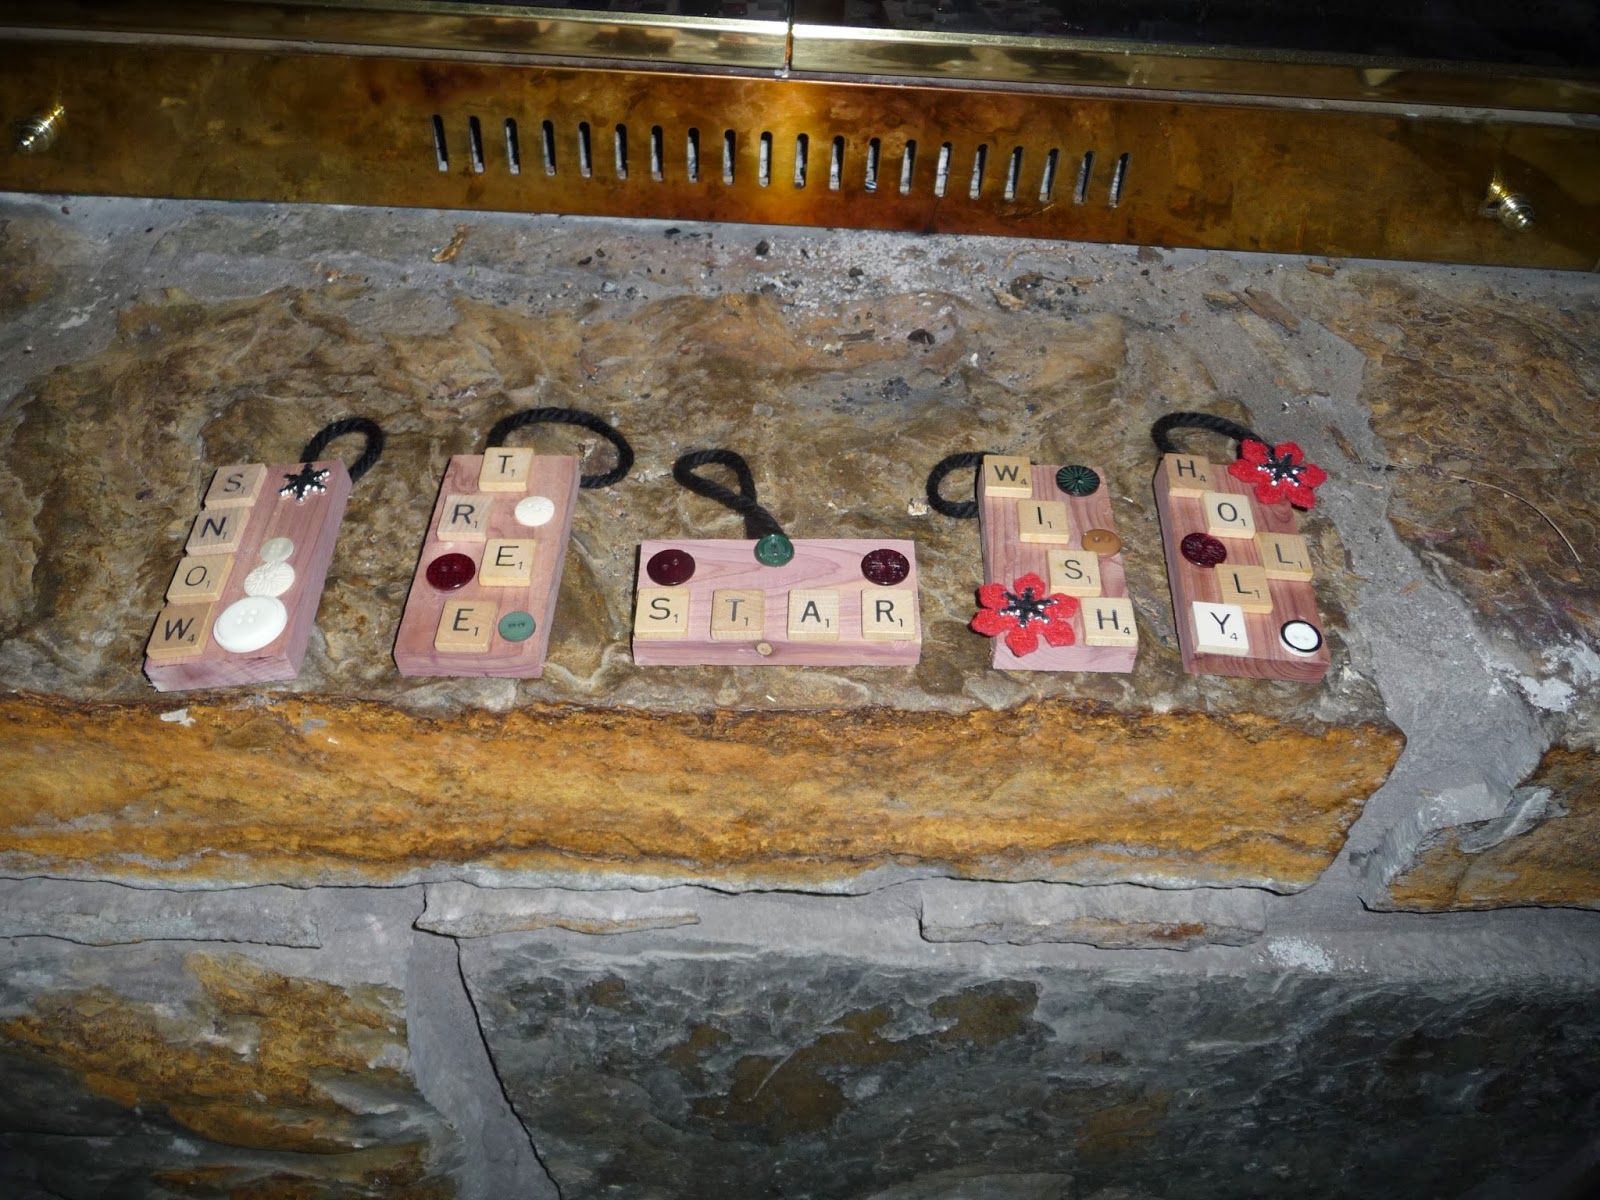
I have become a fan of Pinterest. There are so many cute ideas and things to find on that website, and I find myself just pinning away sometimes! Right before December I found this very cute idea of how to make a very unique ornament that is easy, not very expensive, and also has a rustic feel to it! I also found a new blog that I've started to follow. You can see her instructions here. Mamie Jane's is an awesome place to find ideas on how to decorate using items you just might have on hand, or can easily find! Anyway, take a peak over at her blog to see what she has going on. For those of you that just want to see what I made and how to make them, continue on reading!
The original blog used a few different materials, which I either didn't have, or decided not to use. Here is a list of materials that you will need to use.
You will need:
Glue (I used Aileen's Tacky Glue, but white glue would probably work too)
A bit of thick yarn
A Staple Gun
Embellishments (I used buttons and stick on snowflakes)
Scissors
Letter Tiles (I bought a big lot of Scrabble tiles on Ebay, or you can go to your local craft shop and they sell them in their wood section)
Small blocks of wood (I cut mine to 2x4 inches, however Mamie Jane's blog used old rulers cut to the proper size)
Sandpaper
If you are using a wood block like I did, check your block for the smoothest side. I used rough cut cedar wood that was left over from a project and the one side was rougher than the other. If there was a little roughness on the smooth side where I didn't want it I just sanded it a little with the sand paper.
Take the yarn and cut a piece about five inches long, then fold in half and staple to the back of the wood. I also put a knot at the end of my yarn to help reinforce it with the staple.
Because the Scrabble Letter tiles are smooth and shiny on the back I used a little bit of sandpaper to help it adhere to the wood better with the glue. You don't have to sand a lot, just enough to get the varnish off.
Before you start gluing, you might want to place your letter tiles and embellishments where you want them to make sure they will fit right. With the size block I used the most letters I could get on the block was five, and that was squishing them together very close. By checking the placement before you glue you save yourself a lot of headache, trust me on this one! Using your glue, whatever type you decide to use, place a small dab of glue on the back of the letter tiles. Then place the tiles where you would like them. Once your letters are in the spot where you need them you can then glue on your embellishments. I used buttons and snowflake stickers, but there are so many options in the craft store, so go crazy, or not... LOL!
When you are done, you have a cute, special ornament that you can hang on your own tree, or make a bunch and give them to friends and family! A few of mine will be going to some of my family back in PA!
Well I hope you enjoyed the craft, and maybe you'll have something special you did this year to share with me. If so, leave a comment, I love new ideas. Hope you all had a very Merry Christmas, and that the New Year will bring many blessings to you and your family!
| A look at the finished products. |
| Gathered Supplies |
Glue (I used Aileen's Tacky Glue, but white glue would probably work too)
A bit of thick yarn
A Staple Gun
Embellishments (I used buttons and stick on snowflakes)
Scissors
Letter Tiles (I bought a big lot of Scrabble tiles on Ebay, or you can go to your local craft shop and they sell them in their wood section)
Small blocks of wood (I cut mine to 2x4 inches, however Mamie Jane's blog used old rulers cut to the proper size)
Sandpaper
| I used some scrap cedar we had left over from a previous house project as my wood block. |
| Staple the yarn, to the back of the wood block. |
| Use the sandpaper on the back of the letter tiles. |
| Place a small dab of glue on the letter tile |
| Finished Project! |
Well I hope you enjoyed the craft, and maybe you'll have something special you did this year to share with me. If so, leave a comment, I love new ideas. Hope you all had a very Merry Christmas, and that the New Year will bring many blessings to you and your family!
Saturday, November 16, 2013
Craft Room Reveal!
Okay, so last time I was on here I showed you what my craft room looked like before we did any work on it. My husband recently checked my blog out and "yelled" at me for not posting all the hard work we (he) did in the room. Soooo... here is the pictures from the craft room update!!
So the old wall color was green... not too bad, but not what I wanted. So we painted it this lovely color blue called Rhythmic Blue by Behr. The room only has one small window, and this color really brightened it up a lot! Then we added wainscoting to the bottom portion. We could have bought it in the color white, but I wanted it to be painted a special color white that I found.
The color of the wainscoting is called Swiss Coffee another Behr color. Once the white was up it really brightened up the room and I already started to feel relaxed. We also put in wood floors. I debated and debated about the color. I almost put in a white type wood color, and it would have gone nicely with the beach theme, cuz it looked like it had been painted and worn down by all the sand brought in, but I fell in love with this warm Carmel brown, and I love walking into that room now with those floors!
Because my family is a bunch of nerds we have to have ways to use all of our tech stuff. So on two walls we placed these ports that connect to our home network system and our phones. This wall only has two ports available right now, but we can add up to four more. The other wall has four ports available, and I'm using a lot of them... LOL! More about my nerdy house later!
While the old fan worked, it was out dated and did not really go with the feel of the room, so I found this at Home Depot and fell in love. I love the fact that it looks like its made out of bamboo and something you would use on a porch to fan yourself with. The light is nice too! For once I'm not afraid to put my fan on high speed and fear for my life... LOL!
Of course my Cricut Imagine needed a good place to stay. I'm not sure if this will be its forever home in my craft room, but for now it works very nicely. It was an old computer desk that we had, so the bottom portion is filled with albums I'm currently working on and a shelf system to hold up to five pages that I'm scrapping together. Its also placed next to our tech savy stuff so that I can plug it into our network and not its remotely connected to my computer so I can print from the Cricut Craft room without needing wires running all over my floors. (Really this was my hubs idea which was so amazing of him!)
To the left of the Cricut center is my yarn and paper station. We are still working out the kinks on how to get my paper to be accessible without being a mess. The first idea of using big magazine holders did not work out well, partly because paper is heavy and the magazine holders were made out of thinner plastic. Also, since this pic was taken I have added another bin station for more yarn... I went through a bit of an obsession with yarn for awhile!
I wanted to make as much space usable as possible, so using some cork board I had previously bought for something else, I hung them on my closet door with command strips. Now I can place cards I made/get, and other things on the door. As you can see its also right next to where my desk is... The command center of the room.
My desk was placed in a corner, but pulled away from the wall to give access to the shelves. We are still debating about cutting the shelves so the desk can go back further, but I actually like that its pulled out from the wall and I can get to my other tech savy section of the room without pulling things away from the wall and such. Also, the cats love to sleep back there, so I actually put one of their cat beds back there.
The shelves by my desk go all the way across the wall and I have placed my cartridges there in alphabetical order. I have added a lot more boxes and stuff to this section, but still a lot of organization needs to be done. As I find what works and what doesn't I make changes.
So there is my Craft Room Reveal. I love the colors, the feel and oh the wonderful knowledge that I can go in there and craft away.
Of course this isn't the only remodel we have been doing in our house. My other blog, which is dedicated to our house, our lives, and so much more has a contest going on... Check it out to win a $25 gift card from Home Depot! The House of Nerds is full of interesting things going on in my life, so go check it out and join in the contest! Hope to see you there!
![]() | ||
| Old vs new |
![]() |
| Floors being installed and walls completely painted |
![]() |
| Tech savy stuff! |
![]() |
| An amazing fan! |
![]() |
| Cricut Center |
![]() |
| Yarn and Paper Station |
![]() |
| Corkboard Closet door! |
![]() |
| The Command Center |
![]() |
| Shelves, shelves, and more shelves. |
So there is my Craft Room Reveal. I love the colors, the feel and oh the wonderful knowledge that I can go in there and craft away.
Of course this isn't the only remodel we have been doing in our house. My other blog, which is dedicated to our house, our lives, and so much more has a contest going on... Check it out to win a $25 gift card from Home Depot! The House of Nerds is full of interesting things going on in my life, so go check it out and join in the contest! Hope to see you there!
Tuesday, March 5, 2013
Craft Room Re-DO!
| Our House when we moved in! |
For the next year or so I used the fourth bedroom as my personal office for work, and it was great. No interruptions from the rest of the household while I was busy, and I could even shut the cats out! Then I found a job in my degree of specialty (psychology), and I no longer needed my own office. This left us to wonder what we would do with it.
Eventually, as things usually happen, my love for my crafts gave the room its new purpose, however it wasn't set up right for it.
The desk was squeezed in the corner and covered with a mess, because I had no place to stretch out.
In the opposite corner I have a small folding table that I use for things I'm currently working on, however its not a very sturdy table, so when I go to cut paper it moves and shifts... not the best thing when you are looking for a straight line!
The corner with the window is smushed with temporary shelving units and my Cricut Imagine on an old printer desk! You can barely get to the closet which in itself is a disaster area (someone needs to call that place a state of emergency because it really is!).
The floor is covered in things that I placed there because there was no room for it anywhere else. Walking in that corner shown in the picture is like trying to avoid landmines... it doesn't work very well!
Finally my yarns were corralled in bins, but were not sorted very well, and if you look closely there is a bag full of yarn that didn't even make it into a bin because I ran out of bin room!
![]() |
| www.hdwallpaperspics.com |
So do you have a room that you use to relax? Did you find inspiration from a place or thing to decorate that room, or even your whole house. Leave a comment about what you have done, I'd love to hear! Keep checking back for updates on Craft Room Re-DO!!!!
Sunday, January 6, 2013
New Year, New Blog
So as most of you have noticed I haven't been on my blog in a while. Part of it was because I could not get it to log in. Part of it was because I had no time to actually do any crafts, and another part of it was because I just ran out of ideas. Christmas 2012 my husband bought me a crochet kit to teach myself how to crochet. I fell in love with the whole craft and started making all kinds of things... most of them not what they were supposed to be at first, but in the end I wound up making some really cute things. This year, I decided that my blog is going to be more than just paper crafting, because while I love to paper craft, there are so many other things I love to do. So my blog will be getting revamped... It will still include paper crafts, Cricut things, and so much more of that, but it will also include yarn works and hats, blankets, scarves... so many sweet things that I have been making over the past few months. I'm also hoping to start stocking up an inventory so I can sell some of them on etsy, but we will see how that goes. So I hope that you will stick with me and hang out at the Zoo to see what I come up with and how much fun I have with all my crafting projects. See ya'll soon!!!
Tuesday, August 9, 2011
Just a note
Okay, I am hoping to get on here with another project soon, but I wanted to let everyone know first... Walmart appears to be having a huge sale on their cricut cartridges. I don't know if they are getting rid of that type of merchandise, or if new ones are coming in, but the lite cartridges where I live are $20.00 and the full ones are $30.00 I believe. So check it out. Even if you don't like the lite cartridges very much there are some really cute ones. I purchased two B is for Boy and Live Simply... so basically I got two for the price of one because they are usually about $40.00.
Both of these carts look really cute, and I can so see myself making a bunch of new projects with them. I especially love the boy factor all over the B is for Boy... its hard to find cute boy stuff that I can use for my son, but this one is cute without being too babyish for him. Anyway, check your local Walmart out... doesn't look like its going on at the website, so maybe its just my Walmart, but we all know we are going to be in Walmart at some point this week, so drop by their scrapbook aisle!!! Talk to you all soon!
Wednesday, July 27, 2011
A Dark Birthday!
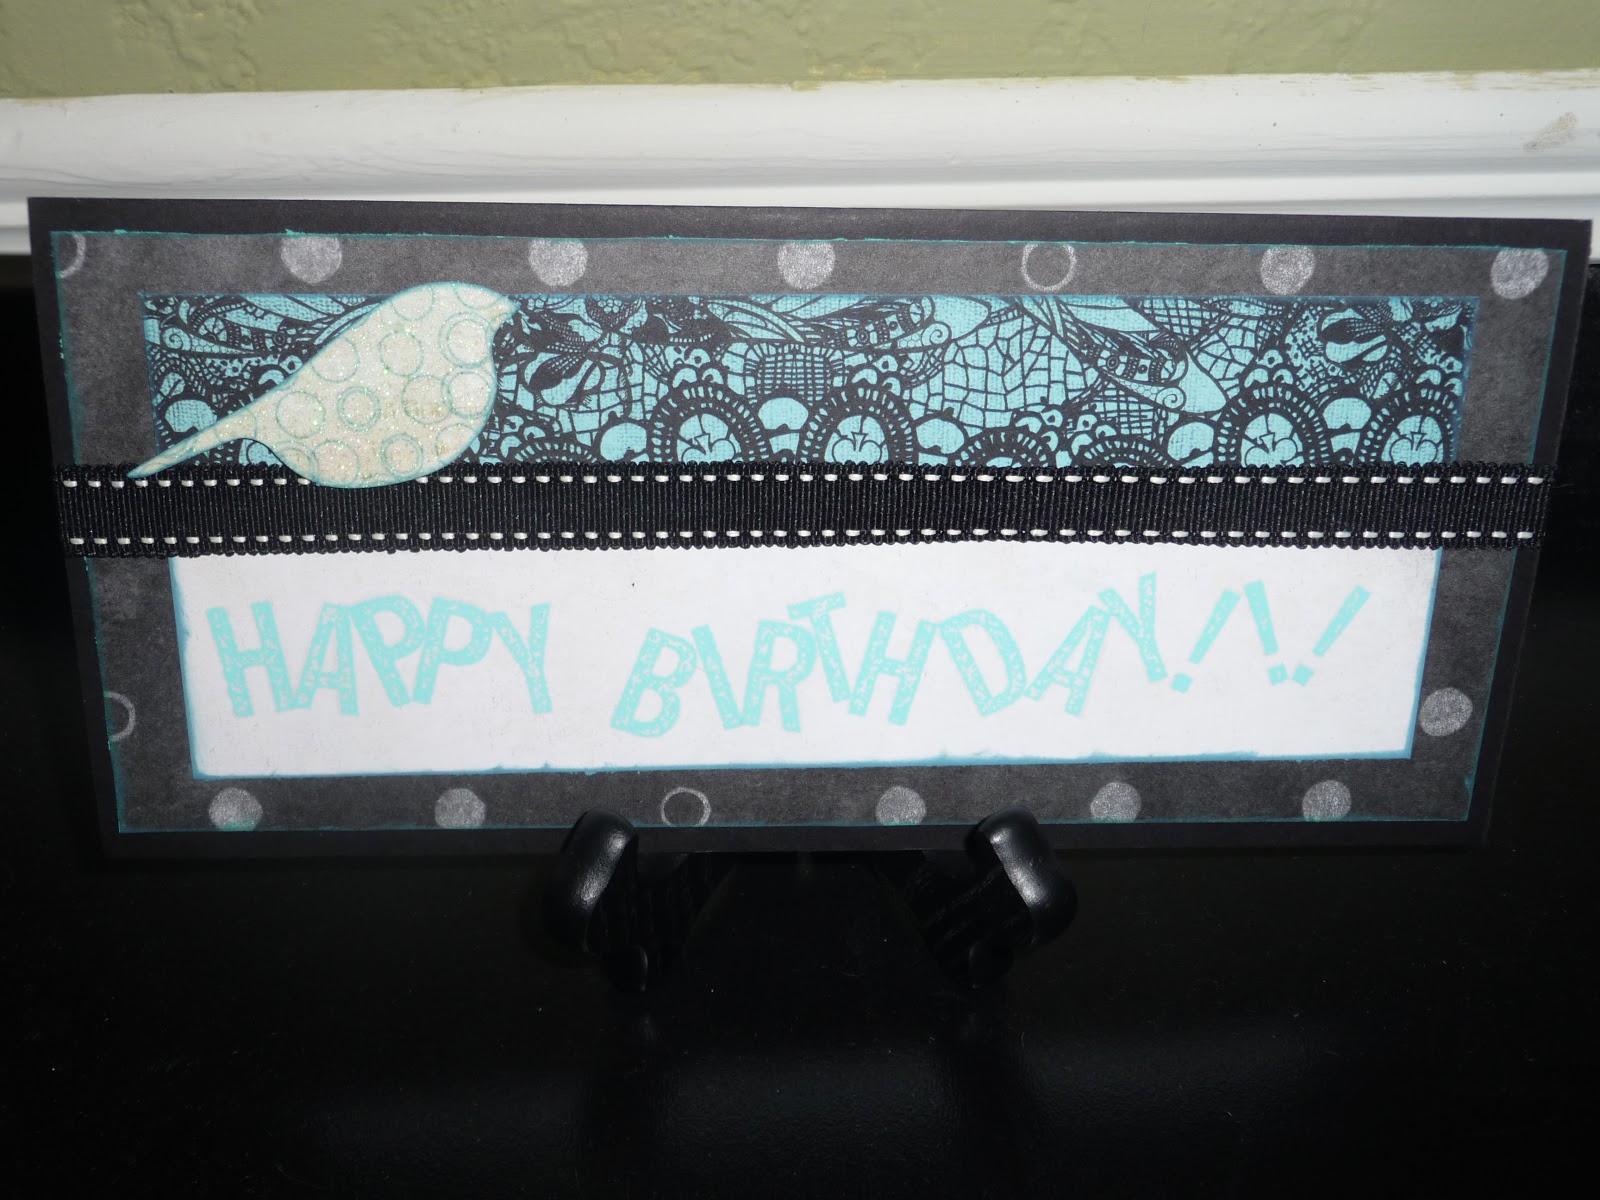
My niece, who is really into black right now, is having a birthday in August, so I decided to make her a nice card to send to her. The only problem was finding colors that she would be okay with. She loves the color black, but making a plain black card is so... well... blah!!! So I started one with other colors, but it turned out to be just a nice card to send for any occasion, so I went back to the drawing board.
While going through my many favorite blogs I came across a challenge at CAS-ual Fridays. They wanted something with rub-ons or stickers, so I started wracking my brains to see if I could incorporate the challenge into my niece's birthday card.
A while back, my husband, being the wonderful enabler that he is... found a bunch of scrapping supplies on sale on e-bay, and actually won the auction. The bundle just happen to come with some really cute rub on letters made by Making Memories. I have a few different fonts to pick from, so it worked out great. The only problem was they all seemed to be black, and I was working with black papers... and then I found the cute blue text that looks like it was stamped on. So taking my new rub-on letters, some carefully chosen papers, my new Cateye Chalk ink and I came up with a really cute card.
I went a little crazy with putting the letters on because I knew I could never keep them straight, so I just angled each letter the opposite way of the one before it, and as I got closer to the end of the area I stretched them out a little more, to kind of give it the impression that I was getting crazy with each letter I put down. If you know my family at all, it fits in perfectly!!!
I was luck with my papers, I had a card stock in plain black that I used for the base of the card, then I have this wonderful Boho Chic pack from The Paper Studio, and then for the top part I needed something that I could rub my letters on that would show up, so I cute a page in half from my DCWV The Street Lace Stack... which I love, but hardly ever use because its so unique and hard to find for the right person. Thankfully, even though there was a lot of pink in the pack... which my niece hates, I was able to come up with a page that had just a touch of black but some cute blue in it too. I took my new cats eye chalk ink and inked up the edges of my papers, and the pretty bird that I found in another pack that is dwindling down because I use it so much. I put a ribbon to break up the white from the color, and there was the front of my card.
I was a little worried though, because the inside was going to be very dark, so I decided to take the other half of the DCWV paper and put it on the inside, with another greeting, and another cute little flower cut out, inking the edges with my new chalk ink again. Finally I used my silver pen to write a personal message inside for my niece.
So there is my latest birthday card. I think it turned out really good considering all the black I used, but I know my niece will love that I didn't send her a cutsie little pink card that she would think was horrible. Hope you all like it, and check out CAS-ual Fridays for some great challenges.
While going through my many favorite blogs I came across a challenge at CAS-ual Fridays. They wanted something with rub-ons or stickers, so I started wracking my brains to see if I could incorporate the challenge into my niece's birthday card.
A while back, my husband, being the wonderful enabler that he is... found a bunch of scrapping supplies on sale on e-bay, and actually won the auction. The bundle just happen to come with some really cute rub on letters made by Making Memories. I have a few different fonts to pick from, so it worked out great. The only problem was they all seemed to be black, and I was working with black papers... and then I found the cute blue text that looks like it was stamped on. So taking my new rub-on letters, some carefully chosen papers, my new Cateye Chalk ink and I came up with a really cute card.
I went a little crazy with putting the letters on because I knew I could never keep them straight, so I just angled each letter the opposite way of the one before it, and as I got closer to the end of the area I stretched them out a little more, to kind of give it the impression that I was getting crazy with each letter I put down. If you know my family at all, it fits in perfectly!!!
I was luck with my papers, I had a card stock in plain black that I used for the base of the card, then I have this wonderful Boho Chic pack from The Paper Studio, and then for the top part I needed something that I could rub my letters on that would show up, so I cute a page in half from my DCWV The Street Lace Stack... which I love, but hardly ever use because its so unique and hard to find for the right person. Thankfully, even though there was a lot of pink in the pack... which my niece hates, I was able to come up with a page that had just a touch of black but some cute blue in it too. I took my new cats eye chalk ink and inked up the edges of my papers, and the pretty bird that I found in another pack that is dwindling down because I use it so much. I put a ribbon to break up the white from the color, and there was the front of my card.
I was a little worried though, because the inside was going to be very dark, so I decided to take the other half of the DCWV paper and put it on the inside, with another greeting, and another cute little flower cut out, inking the edges with my new chalk ink again. Finally I used my silver pen to write a personal message inside for my niece.
So there is my latest birthday card. I think it turned out really good considering all the black I used, but I know my niece will love that I didn't send her a cutsie little pink card that she would think was horrible. Hope you all like it, and check out CAS-ual Fridays for some great challenges.
Friday, July 8, 2011
A Summer Birthday Card
So, this month is a lot easier on birthday cards than June was... I think I got overloaded when it came to the month of June, but here I am back posting a really cute card for my nephew in NY. His birthday is at the end of July, and for his second birthday I was able to be there for the big party. I remember it was really hot in NY, and the block where he lives closed down for a block party. It was loads of fun, and I carry those wonderful memories with me all over the place.
At any rate, whenever I think of his birthday I think of that party and the hot summer sun, so I decided to do a summer themed card, and it just happened to coincide with Fabtabulous Cricut Challenge Me Monday . The theme this week at Fantabulous Cricut is Pool time. So I thought about my favorite times growing up and getting into the water, and the best memory I have is my first time at the beach. My parents took me to Myrtle Beach to pick my brother up from college, and we got to go to the beach for some added fun. I remember being a little afraid of the ocean, I was about 7 or 8 at the time, so it sounded really loud and scary, especially at night. However, my favorite thing to do was to gather up sea shells and starfish that was on the beach. So I decided to make a card with that theme on it.
I took the shape idea of the potted plant that I saw in my recent Scrapbook etc. Mag and tweaked it so it would look like a little sand bucket. Then I added my little crab from Create a Critter Cart. The crab is holding the new stamped sentiment I recently bought on clearance from Hobby Lobby, its from The Paper Studio, and it seemed to fit perfectly for this card. Now every bucket needs a handle, but I didn't have anything really sturdy to use, so I improvised and used some ribbon from another clearence rack I found while I was in PA, and it acts as the handle.
The card does not open, but rather a seperate sheet is tucked in at the top, and you pull it out to see the message inside. To decorate the top I put sea shells and star fish from the create a critter Cart too. Then I took a marker, because I didn't have the right ink to really do it up right, and outlined the edges, put a little stickles on the sea shells, and there you have it. When I showed it to my hubby he said it needed a shovel, but I didn't have any cartridges with a shovel, so instead of giving up, I went ahead and designed a shovel out of scrap card stock I had laying around, then outlined it with a couple of markers and glue dotted it on the back. This way he can see the whole shovel when he pulls the message part out.
So now I have a really cute card designed just for my nephew in mind, and the summer fun we had when he turned two. We live very far apart now, so I don't get to see them at all anymore, but at least I can remember his birthday in a special way. Oh, and another cute thought... without even thinking I put a crab on the card, and his name happens to be Sebastian, as in the crab from The Little Mermaid... how appropriate is that!!! See you all soon.
At any rate, whenever I think of his birthday I think of that party and the hot summer sun, so I decided to do a summer themed card, and it just happened to coincide with Fabtabulous Cricut Challenge Me Monday . The theme this week at Fantabulous Cricut is Pool time. So I thought about my favorite times growing up and getting into the water, and the best memory I have is my first time at the beach. My parents took me to Myrtle Beach to pick my brother up from college, and we got to go to the beach for some added fun. I remember being a little afraid of the ocean, I was about 7 or 8 at the time, so it sounded really loud and scary, especially at night. However, my favorite thing to do was to gather up sea shells and starfish that was on the beach. So I decided to make a card with that theme on it.
I took the shape idea of the potted plant that I saw in my recent Scrapbook etc. Mag and tweaked it so it would look like a little sand bucket. Then I added my little crab from Create a Critter Cart. The crab is holding the new stamped sentiment I recently bought on clearance from Hobby Lobby, its from The Paper Studio, and it seemed to fit perfectly for this card. Now every bucket needs a handle, but I didn't have anything really sturdy to use, so I improvised and used some ribbon from another clearence rack I found while I was in PA, and it acts as the handle.
The card does not open, but rather a seperate sheet is tucked in at the top, and you pull it out to see the message inside. To decorate the top I put sea shells and star fish from the create a critter Cart too. Then I took a marker, because I didn't have the right ink to really do it up right, and outlined the edges, put a little stickles on the sea shells, and there you have it. When I showed it to my hubby he said it needed a shovel, but I didn't have any cartridges with a shovel, so instead of giving up, I went ahead and designed a shovel out of scrap card stock I had laying around, then outlined it with a couple of markers and glue dotted it on the back. This way he can see the whole shovel when he pulls the message part out.
So now I have a really cute card designed just for my nephew in mind, and the summer fun we had when he turned two. We live very far apart now, so I don't get to see them at all anymore, but at least I can remember his birthday in a special way. Oh, and another cute thought... without even thinking I put a crab on the card, and his name happens to be Sebastian, as in the crab from The Little Mermaid... how appropriate is that!!! See you all soon.
Quick Post!
Okay, I have not fallen off the face of the planet... trust me I'm still here. I started a new shift at work and I'm a bit overwhelmed by how much this has screwed up my whole week. At any rate, I have not stopped crafting, and I have a really cute card that I am hoping to post tomorrow... after I pry my eyes open from a long nights sleep.
At any rate, I did want to let you all know that I finally broke down and bought my first set of stamps. I was working on a birthday card for my nephew in NY, and while I didn't really need any stamps for it, I found the perfect set of stamps for birthdays on clearance. They are from The Paper Studio, and I found them at Hobby Lobby! Trust me this won't be the last of my stamp collection, but it is a good start, and I think it really made the card I made stand out!!! So stop on by and take a look tomorrow.
Also, I have been thinking about doing a blog hop in the future. What do you think??? Would you want to be involved. Its not something set in stone right now, but its definitely something I am thinking about... my husband actually suggested it. So leave a comment and let me know what you think. See you all tomorrow!
At any rate, I did want to let you all know that I finally broke down and bought my first set of stamps. I was working on a birthday card for my nephew in NY, and while I didn't really need any stamps for it, I found the perfect set of stamps for birthdays on clearance. They are from The Paper Studio, and I found them at Hobby Lobby! Trust me this won't be the last of my stamp collection, but it is a good start, and I think it really made the card I made stand out!!! So stop on by and take a look tomorrow.
Also, I have been thinking about doing a blog hop in the future. What do you think??? Would you want to be involved. Its not something set in stone right now, but its definitely something I am thinking about... my husband actually suggested it. So leave a comment and let me know what you think. See you all tomorrow!
Thursday, June 23, 2011
GiveAway at My Scrapbook Addiction!
Hey everyone! One of the blogs I am following is having a giveaway for the new Echo Park Country Drive release. Check into it, I googled the pictures of the papers and they are very sweet. Just click the link and it will take you right to the right page!!!
My Scrapbook Addiction Echo Park Giveaway
Sunday, June 19, 2011
The Cutest Paper Purse Gift Bag!!
Okay, so it has been awhile since I've actually posted a project on here. For starters, my Chemistry class is kicking my butt... I forgot how demanding science classes can be, and my History of Psychology class is well... history, which is cool, but a lot of information to take in, and of course this one is only an 8 week class, so I'm totally overwhelmed by the amount of work that I need to do each week!! I should be used to it by now.
Another thing is I started a project in my son's bathroom. We haven't painted that room since we moved in, a little over a year ago, and it is past time for a refreshing new color and theme in there... so this weekend I picked up my paint brush and started painting away. Of course, now my back and legs are demanding some time to relax on the couch in front of the TV, but I saw this project and I thought it was too cute to not do this weekend. So today after work was over I pulled out my supplies and followed along with the video that I was directed to.
Now first I have to give credit to a couple of people that I followed to come up with this project. The first person is Mary over at Cardz TV, who was showcasing a card she received from another blogger Karey from Creative Craft Corner, which is where I saw a post about the purse originally. She linked the purse to another blog which is Stamp & Scrap with Frenchie, who by the way has the cutest accent you will ever hear. I can't figure out exactly where it is from, but I love it!!! So now that you know where I came up with the idea let me show you some pics and tell you briefly how to put it together. If you go to Frenchie's blog with the above link it takes you right to her video where she explains it in full detail, and it is really easy to follow.
I started out with a full 12x12 piece of paper from my DCWV All Dressed Up paper pack (which I have to say has some amazing papers). I then used some scraps of paper for the top part (brown section) two pieces of 6.5x2 scored in the middle. I agree with Frenchie when she says you need good glue, but I used some medium brads to hold my ribbon in place, so that should help it stay in place. The brads were from a clearance stack I picked up awhile ago. The ribbon I bought from Crafty Steals. If you haven't checked out their website you should. They have some awesome deals. Anyway, the ribbon is from American Crafts Everyday Ribbon Box which came with several different selections of ribbons, and the quality is amazing on these ribbons... of course this means I now have to find a better way to store my ribbon as I'm starting to actually get quite a collection!!!
The hard part for me was the closure. Frenchie uses velcro, but I didn't have anything like that around my house. I've promised my DH that I would hold off on buying anymore supplies until I have a better ER fund in my bank, so I had to figure out what to do, so using my puncher that I use for my brads I punched two holes on each side in the middle, then sewed twine and tied it off, then on the second side I sewed a spare button I had laying around, and then looped the twine around the button to hold it closed.
Finally, I added some bling with my little flower. The paper already has sparkle to it, but I wanted to add a little something extra, so I pulled out my few flowers I have stashed away, and placed it on using a brad. Of course you should do this before you start gluing the top part on because it makes it harder to reach in there.
And now I have a cute little gift bag that can hold quite a few little items!!! So using this for a friends graduation present!!!
Hope you are all having a lovely Father's Day!!! Enjoy!!!
Another thing is I started a project in my son's bathroom. We haven't painted that room since we moved in, a little over a year ago, and it is past time for a refreshing new color and theme in there... so this weekend I picked up my paint brush and started painting away. Of course, now my back and legs are demanding some time to relax on the couch in front of the TV, but I saw this project and I thought it was too cute to not do this weekend. So today after work was over I pulled out my supplies and followed along with the video that I was directed to.
Now first I have to give credit to a couple of people that I followed to come up with this project. The first person is Mary over at Cardz TV, who was showcasing a card she received from another blogger Karey from Creative Craft Corner, which is where I saw a post about the purse originally. She linked the purse to another blog which is Stamp & Scrap with Frenchie, who by the way has the cutest accent you will ever hear. I can't figure out exactly where it is from, but I love it!!! So now that you know where I came up with the idea let me show you some pics and tell you briefly how to put it together. If you go to Frenchie's blog with the above link it takes you right to her video where she explains it in full detail, and it is really easy to follow.
I started out with a full 12x12 piece of paper from my DCWV All Dressed Up paper pack (which I have to say has some amazing papers). I then used some scraps of paper for the top part (brown section) two pieces of 6.5x2 scored in the middle. I agree with Frenchie when she says you need good glue, but I used some medium brads to hold my ribbon in place, so that should help it stay in place. The brads were from a clearance stack I picked up awhile ago. The ribbon I bought from Crafty Steals. If you haven't checked out their website you should. They have some awesome deals. Anyway, the ribbon is from American Crafts Everyday Ribbon Box which came with several different selections of ribbons, and the quality is amazing on these ribbons... of course this means I now have to find a better way to store my ribbon as I'm starting to actually get quite a collection!!!
The hard part for me was the closure. Frenchie uses velcro, but I didn't have anything like that around my house. I've promised my DH that I would hold off on buying anymore supplies until I have a better ER fund in my bank, so I had to figure out what to do, so using my puncher that I use for my brads I punched two holes on each side in the middle, then sewed twine and tied it off, then on the second side I sewed a spare button I had laying around, and then looped the twine around the button to hold it closed.
Finally, I added some bling with my little flower. The paper already has sparkle to it, but I wanted to add a little something extra, so I pulled out my few flowers I have stashed away, and placed it on using a brad. Of course you should do this before you start gluing the top part on because it makes it harder to reach in there.
And now I have a cute little gift bag that can hold quite a few little items!!! So using this for a friends graduation present!!!
Hope you are all having a lovely Father's Day!!! Enjoy!!!
Thursday, June 16, 2011
Quick Question!
Okay, this is a quick post. I have some new cards I need to put up, but this week has been crazy. I've had several days of training at work (ugh), and I've been trying to clean my son's room... now a person would think that when there is only one child in the house that there should not be too much of a mess... that person needs to come to my house and see how much of a mess one child can make. It our annual, go through the old toys because our birthday is almost here and we have to make room for the new toys, however we find the old toys we forgot about and suddenly want to play with them (double ugh). At any rate, I will be posting soon, probably this weekend, but I wanted to put a question up for you all!
I am looking into buying my very first stamp set, but there are so many out there, and its so hard to pick. What is your go to stamp kit if you stamp at all, and where did you get it from? I know there are a lot of sites out there that sell stamps, and I even follow a couple of blogs that sell stamps, and I'm looking into all of them, but as I said, so many to choose from and I start to hyperventilate, and just walk away before I even purchase anything. I know that once I get one set I'll be able to get another one much easier, but its the first set that is holding me up. So come on with all of your suggestions, tell me your favorites, how you tend to use them, and what you suggest I should buy! Thanks in advance!
Saturday, June 11, 2011
Head over to Flair and Frills!!!!
Okay all my wonderful followers!!! There is an awesome giveaway going on over at Flair and Frills , so if your not a follower of this page go check it out now, and if you decide to enter into it, please leave my name so I can get some extra entries for this wonderful giveaway. Go check it out for yourself... looks awesome!!!
Stop drooling already and head over there!!! Seriously!!
Another Challenge Card
So this month has been very busy for me in the card area. I have had three anniversaries, and three birthdays, not to mention Father's Day... so I have been busy!!! I don't know about ya'll, but sometimes when I'm making so many cards at once I get creative blocks, and I start to wonder if I've ran out of ideas. When that happens sometimes I go to other blogs I follow to generate ideas, and other times, like this one, I used a challenge to get an idea.
Over at CAS-usal Fridays they have a weekly challenge, and this week was a tic-tac-toe choice. You could do either row of blocks, but all three elements had to be on your card. So I choose to do Ribbon, Die Cuts or Punches, and Felt. I was a little worried about the felt, but by the time I realized that I had put a ribbon instead of twine it was too late to go back, so I dug around and finally came up with the perfect solution!
The die cut is the little birds with the saying Perfect Harmony, and then another cut out of a bird, and I fun flocked it to give it the felt effect. Then the ribbon was placed behind the die cut. All of the papers and die cuts were from the Crate Paper, Lillian Collection Kit that I purchased a few weeks ago. I love the papers, and the birds are awesome. The papers are double sided, so you can use them in a variety of ways. The ribbon was from my stash, which by the way is slowly getting a little bit bigger. I pick up most of my ribbon on clearance, because I feel a little guilty buying expensive ribbon for something I might not use.
This is how the card looks folded down. I did this in the twisted easel format again. This style is pretty easy to do, and I know that my niece, who follows my blog, will be able to tell her mom, which this is for, how to open it. Of course, she may be watching my blog now too, but she doesn't spend a lot of time on the computer, so I think it will be safe. Anyway, it is an anniversary card for my sister and her husband, and I thought the sentiment of Perfect Harmony fits them. To some they may appear complete opposites, but my sister brings out the best in her husband, and he does the same for her!!! It is nice to see a marriage actually working and not hearing about horror stories from either side! At any rate, I think they will like it.
So there you have it, another card for the month of June. I still have to finish up my son's b-day card, but that one is going to take a lot of though. He's turning 12 this year, but he has PDD-NOS, and so he's not like most kids his age, which just means that his card will be really special!
Well hope you all have a great day today! See ya around!
Over at CAS-usal Fridays they have a weekly challenge, and this week was a tic-tac-toe choice. You could do either row of blocks, but all three elements had to be on your card. So I choose to do Ribbon, Die Cuts or Punches, and Felt. I was a little worried about the felt, but by the time I realized that I had put a ribbon instead of twine it was too late to go back, so I dug around and finally came up with the perfect solution!
The die cut is the little birds with the saying Perfect Harmony, and then another cut out of a bird, and I fun flocked it to give it the felt effect. Then the ribbon was placed behind the die cut. All of the papers and die cuts were from the Crate Paper, Lillian Collection Kit that I purchased a few weeks ago. I love the papers, and the birds are awesome. The papers are double sided, so you can use them in a variety of ways. The ribbon was from my stash, which by the way is slowly getting a little bit bigger. I pick up most of my ribbon on clearance, because I feel a little guilty buying expensive ribbon for something I might not use.
This is how the card looks folded down. I did this in the twisted easel format again. This style is pretty easy to do, and I know that my niece, who follows my blog, will be able to tell her mom, which this is for, how to open it. Of course, she may be watching my blog now too, but she doesn't spend a lot of time on the computer, so I think it will be safe. Anyway, it is an anniversary card for my sister and her husband, and I thought the sentiment of Perfect Harmony fits them. To some they may appear complete opposites, but my sister brings out the best in her husband, and he does the same for her!!! It is nice to see a marriage actually working and not hearing about horror stories from either side! At any rate, I think they will like it.
So there you have it, another card for the month of June. I still have to finish up my son's b-day card, but that one is going to take a lot of though. He's turning 12 this year, but he has PDD-NOS, and so he's not like most kids his age, which just means that his card will be really special!
Well hope you all have a great day today! See ya around!
Subscribe to:
Posts (Atom)