Hey everyone! One of the blogs I am following is having a giveaway for the new Echo Park Country Drive release. Check into it, I googled the pictures of the papers and they are very sweet. Just click the link and it will take you right to the right page!!!
My Scrapbook Addiction Echo Park Giveaway
Thursday, June 23, 2011
Sunday, June 19, 2011
The Cutest Paper Purse Gift Bag!!
Okay, so it has been awhile since I've actually posted a project on here. For starters, my Chemistry class is kicking my butt... I forgot how demanding science classes can be, and my History of Psychology class is well... history, which is cool, but a lot of information to take in, and of course this one is only an 8 week class, so I'm totally overwhelmed by the amount of work that I need to do each week!! I should be used to it by now.
Another thing is I started a project in my son's bathroom. We haven't painted that room since we moved in, a little over a year ago, and it is past time for a refreshing new color and theme in there... so this weekend I picked up my paint brush and started painting away. Of course, now my back and legs are demanding some time to relax on the couch in front of the TV, but I saw this project and I thought it was too cute to not do this weekend. So today after work was over I pulled out my supplies and followed along with the video that I was directed to.
Now first I have to give credit to a couple of people that I followed to come up with this project. The first person is Mary over at Cardz TV, who was showcasing a card she received from another blogger Karey from Creative Craft Corner, which is where I saw a post about the purse originally. She linked the purse to another blog which is Stamp & Scrap with Frenchie, who by the way has the cutest accent you will ever hear. I can't figure out exactly where it is from, but I love it!!! So now that you know where I came up with the idea let me show you some pics and tell you briefly how to put it together. If you go to Frenchie's blog with the above link it takes you right to her video where she explains it in full detail, and it is really easy to follow.
 I started out with a full 12x12 piece of paper from my DCWV All Dressed Up paper pack (which I have to say has some amazing papers). I then used some scraps of paper for the top part (brown section) two pieces of 6.5x2 scored in the middle. I agree with Frenchie when she says you need good glue, but I used some medium brads to hold my ribbon in place, so that should help it stay in place. The brads were from a clearance stack I picked up awhile ago. The ribbon I bought from Crafty Steals. If you haven't checked out their website you should. They have some awesome deals. Anyway, the ribbon is from American Crafts Everyday Ribbon Box which came with several different selections of ribbons, and the quality is amazing on these ribbons... of course this means I now have to find a better way to store my ribbon as I'm starting to actually get quite a collection!!!
The hard part for me was the closure. Frenchie uses velcro, but I didn't have anything like that around my house. I've promised my DH that I would hold off on buying anymore supplies until I have a better ER fund in my bank, so I had to figure out what to do, so using my puncher that I use for my brads I punched two holes on each side in the middle, then sewed twine and tied it off, then on the second side I sewed a spare button I had laying around, and then looped the twine around the button to hold it closed.

 Finally, I added some bling with my little flower. The paper already has sparkle to it, but I wanted to add a little something extra, so I pulled out my few flowers I have stashed away, and placed it on using a brad. Of course you should do this before you start gluing the top part on because it makes it harder to reach in there.
 And now I have a cute little gift bag that can hold quite a few little items!!! So using this for a friends graduation present!!!
 Hope you are all having a lovely Father's Day!!! Enjoy!!!
Another thing is I started a project in my son's bathroom. We haven't painted that room since we moved in, a little over a year ago, and it is past time for a refreshing new color and theme in there... so this weekend I picked up my paint brush and started painting away. Of course, now my back and legs are demanding some time to relax on the couch in front of the TV, but I saw this project and I thought it was too cute to not do this weekend. So today after work was over I pulled out my supplies and followed along with the video that I was directed to.
Now first I have to give credit to a couple of people that I followed to come up with this project. The first person is Mary over at Cardz TV, who was showcasing a card she received from another blogger Karey from Creative Craft Corner, which is where I saw a post about the purse originally. She linked the purse to another blog which is Stamp & Scrap with Frenchie, who by the way has the cutest accent you will ever hear. I can't figure out exactly where it is from, but I love it!!! So now that you know where I came up with the idea let me show you some pics and tell you briefly how to put it together. If you go to Frenchie's blog with the above link it takes you right to her video where she explains it in full detail, and it is really easy to follow.

The hard part for me was the closure. Frenchie uses velcro, but I didn't have anything like that around my house. I've promised my DH that I would hold off on buying anymore supplies until I have a better ER fund in my bank, so I had to figure out what to do, so using my puncher that I use for my brads I punched two holes on each side in the middle, then sewed twine and tied it off, then on the second side I sewed a spare button I had laying around, and then looped the twine around the button to hold it closed.


Thursday, June 16, 2011
Quick Question!
Okay, this is a quick post. I have some new cards I need to put up, but this week has been crazy. I've had several days of training at work (ugh), and I've been trying to clean my son's room... now a person would think that when there is only one child in the house that there should not be too much of a mess... that person needs to come to my house and see how much of a mess one child can make. It our annual, go through the old toys because our birthday is almost here and we have to make room for the new toys, however we find the old toys we forgot about and suddenly want to play with them (double ugh). At any rate, I will be posting soon, probably this weekend, but I wanted to put a question up for you all!
I am looking into buying my very first stamp set, but there are so many out there, and its so hard to pick. What is your go to stamp kit if you stamp at all, and where did you get it from? I know there are a lot of sites out there that sell stamps, and I even follow a couple of blogs that sell stamps, and I'm looking into all of them, but as I said, so many to choose from and I start to hyperventilate, and just walk away before I even purchase anything. I know that once I get one set I'll be able to get another one much easier, but its the first set that is holding me up. So come on with all of your suggestions, tell me your favorites, how you tend to use them, and what you suggest I should buy! Thanks in advance!
I am looking into buying my very first stamp set, but there are so many out there, and its so hard to pick. What is your go to stamp kit if you stamp at all, and where did you get it from? I know there are a lot of sites out there that sell stamps, and I even follow a couple of blogs that sell stamps, and I'm looking into all of them, but as I said, so many to choose from and I start to hyperventilate, and just walk away before I even purchase anything. I know that once I get one set I'll be able to get another one much easier, but its the first set that is holding me up. So come on with all of your suggestions, tell me your favorites, how you tend to use them, and what you suggest I should buy! Thanks in advance!
Saturday, June 11, 2011
Head over to Flair and Frills!!!!
Okay all my wonderful followers!!! There is an awesome giveaway going on over at Flair and Frills , so if your not a follower of this page go check it out now, and if you decide to enter into it, please leave my name so I can get some extra entries for this wonderful giveaway. Go check it out for yourself... looks awesome!!!
 Stop drooling already and head over there!!! Seriously!!

Another Challenge Card
So this month has been very busy for me in the card area. I have had three anniversaries, and three birthdays, not to mention Father's Day... so I have been busy!!! I don't know about ya'll, but sometimes when I'm making so many cards at once I get creative blocks, and I start to wonder if I've ran out of ideas. When that happens sometimes I go to other blogs I follow to generate ideas, and other times, like this one, I used a challenge to get an idea.
 Over at CAS-usal Fridays they have a weekly challenge, and this week was a tic-tac-toe choice. You could do either row of blocks, but all three elements had to be on your card. So I choose to do Ribbon, Die Cuts or Punches, and Felt. I was a little worried about the felt, but by the time I realized that I had put a ribbon instead of twine it was too late to go back, so I dug around and finally came up with the perfect solution!
 The die cut is the little birds with the saying Perfect Harmony, and then another cut out of a bird, and I fun flocked it to give it the felt effect. Then the ribbon was placed behind the die cut. All of the papers and die cuts were from the Crate Paper, Lillian Collection Kit that I purchased a few weeks ago. I love the papers, and the birds are awesome. The papers are double sided, so you can use them in a variety of ways. The ribbon was from my stash, which by the way is slowly getting a little bit bigger. I pick up most of my ribbon on clearance, because I feel a little guilty buying expensive ribbon for something I might not use.

This is how the card looks folded down. I did this in the twisted easel format again. This style is pretty easy to do, and I know that my niece, who follows my blog, will be able to tell her mom, which this is for, how to open it. Of course, she may be watching my blog now too, but she doesn't spend a lot of time on the computer, so I think it will be safe. Anyway, it is an anniversary card for my sister and her husband, and I thought the sentiment of Perfect Harmony fits them. To some they may appear complete opposites, but my sister brings out the best in her husband, and he does the same for her!!! It is nice to see a marriage actually working and not hearing about horror stories from either side! At any rate, I think they will like it.
So there you have it, another card for the month of June. I still have to finish up my son's b-day card, but that one is going to take a lot of though. He's turning 12 this year, but he has PDD-NOS, and so he's not like most kids his age, which just means that his card will be really special!
Well hope you all have a great day today! See ya around!
Thursday, June 9, 2011
Reusing my Glass Jars
Okay, so I don't know about any of you, but the prices of glass jars at the craft store are crazy, and even at Wal-mart and such. Sure some of them come in cute shapes, but still, I mean, here is a pic of a small jar I picked up with flowers in it for about $6. The only reason I picked this up was because I really liked the flowers, but I vowed to never do it again!
 So one day, after dinner I was cleaning up and getting ready to toss my spaghetti sauce jar in the recycling, when I realized that I loved the shape of the jar. It dawned on me that I had been throwing away glass jars for months now (years, but months since I started craving jars for my scrapbook room), and here was this perfect jar for storing stuff in. It was a little blah in the cute factor, as in, I really didn't like the lid, but the jar itself was perfect.
 So I decided to start saving them and as I found things to put them in I place them in there. Then today while I was cleaning up in my craft room I found some leftover fabric I had used months ago. So I pulled out my hot glue gun, and with the help of my DH, I was able to make a cute top to cover up the lid that was, well a little less cute.
 You can't really see it in the picture, but the fabric has monkeys on it, which I thought fit my whole Purple Giraffe thing going, I mean you can have more than one animal in a zoo, right! I took some ribbon that I bought on clearance recently, tied it in a knot, and glued it into place in three spots, and now its ready for storage in the cutest fashion.
So has anyone else done something like this to save on money for your storage. I love having my room all organized (which its not right now, in the middle of redoing things in my room, and its gonna be awhile before its done), but I hate paying the prices, so when I find ways to save like this I love it. If you have a story of normal objects being put to usefulness tell us, who knows, I might have to try it out myself!!!


So has anyone else done something like this to save on money for your storage. I love having my room all organized (which its not right now, in the middle of redoing things in my room, and its gonna be awhile before its done), but I hate paying the prices, so when I find ways to save like this I love it. If you have a story of normal objects being put to usefulness tell us, who knows, I might have to try it out myself!!!
A Special Father's Day Card
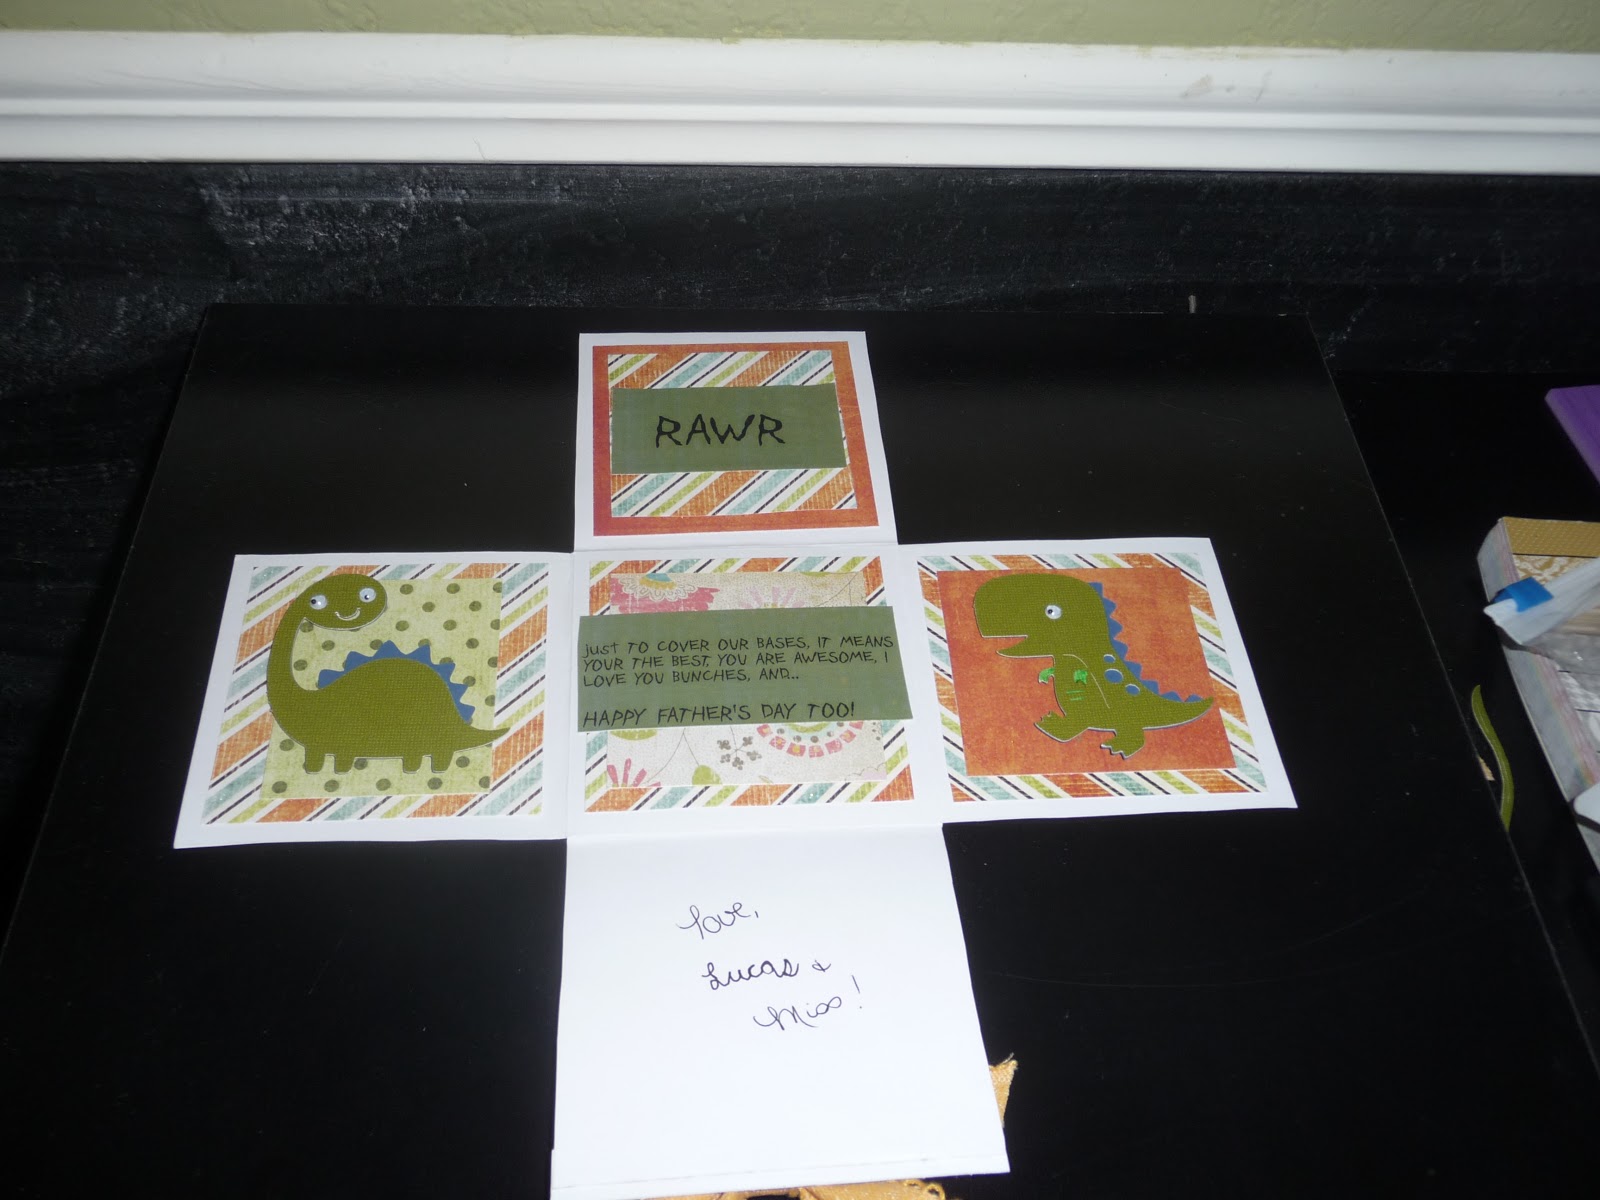
This year, I wanted to make a special Father's Day Card for my husband from my son and myself. I've watching the blogs for some ideas, and I finally found one that I really liked. Recently there was a challenge to make a Father's day card, over at Fantabulous Cricut , and I was looking over the entries that were made when I came across Cricut Crafting Grammy's Fold Card she made for her Son in law. I loved the idea, but didn't think that I had the right paperdolls to get across what my DH means to me and my son, so I fell back on a family thing... I put in dinosaurs! The card is unique in that it starts out looking like a little gift, something I changed up from the original idea I saw.
 You can't really see it in this picture, but I also placed a piece of scrap paper of the same design on the top to make it look like its the top of a box. Then I grabbed some ribbon I recently bought on clearance in PA while I was there (of course this was the one color I thought I would never use, go figure). I used a pop dot to hold the ribbon in place.

You open it up, and I placed my sentiment for Father's Day there, and the back of the gift box portion is a great place to sign too. I used the Feeling Groovy Cart for the letters on this page.
 Lift up the side that said Happy Father's Day and on the back is another section that we put the word RAWR in big letters. I made this on my computer, I found this awesome font called Dinosaur Jr, and it is great for dinosaur projects like this one.
 Pull the next fold open and you see our very first dinosaur. I used the Create a critter cart, which is quickly becoming a favorite. I love the dinosaurs especially!!!
 Pull the final fold open and you find our last dinosaur, again from create a critter cart, and the final sentiment is pasted in. Now, I'm not sure if you all know this, but Dinos do not have a very big vocabulary. Their basic word is RAWR, and it means a lot of different things, so for this card we had to make sure that he knew exactly what our dinosaurs were saying to him!
 Well I hope you liked the card. I loved this project, and it was so unique. I can't wait to give it to my hubby. I'm entering this in the color challenge over on The Pink Stamper. Check it out, the colors are Orange, Turquoise, and Green (and any other colors can be added). What is funny, is that while I wanted to join in this challenge I wasn't sure if I would be able to cuz I have so much going on right now. However, when I asked my son to pic out a base color page for our project he ended up with the striped color page from my My Mind's Eye, Where The Heart Is Collection. I have to say I love this paper pack, so many cute colors, and I love the shades and extras they add to it. So I used a bunch of scraps for the dinos and for the boxes I used scraps from the My Mind's Eye collection, along with another flowered scrap that went with our colors for the center box.
Enjoy your day everyone!


You open it up, and I placed my sentiment for Father's Day there, and the back of the gift box portion is a great place to sign too. I used the Feeling Groovy Cart for the letters on this page.


Enjoy your day everyone!
Wednesday, June 8, 2011
A Father's Day Card
Before I start on my new card, I wanted to remind you all that Chick-n-Scrap is having a huge giveaway, so head on over there and get yourself entered in. There is a link on my sidebar for it too!
Now on to my first Father's Day card of the year. Since my father passed away several years ago I try to find someone special in my life that I think needs a nice reminder that they are a good father. This year, I stuck with my mother's day theme and I'm sending one to my brother (I sent a card to my sister for mother's day, so figured my bro might like a father's day one). I didn't want to make it too sentimental, because, well that just isn't my brother, so I made it simple and to the point.
 I found this cute cut on my Handy Man cart, which by the way is a great cart for all the boys in your life, so many tools and such. I like to use it for our remodeling scrapbook that I have been keeping of our new house (I'll have to share some of those sometime with ya'll).
I used the twisted easel cut that I found on Mary's Cardz Tv awhile ago. I just love this design, and I hope my brother gets that he's supposed to stand it up!!!
 Then I added a simple sentiment from my heart, and it was all set to go. The dimensions are the same that are mentioned on Mary's Cardz Tv, and she is really easy to follow along with. If you haven't visited her blog yet, you really should. Love some of her ideas... okay, I love most of her ideas!
 I used pop dots on the sentiment to help keep the card standing where it needs to be, and also on the base of the wheelbarrow, just to give it a little dimension. I'm entering this in the Fantabulous Cricut:Challenge Me Monday challenge which is all about Father's day this week. Take a peak at what others have come up with... I know I'm stealing a few ideas from some of the posts I've seen there.
Well I guess that is all for now. Hope you all have a great Wednesday, and I'll be seeing you all soon.
Now on to my first Father's Day card of the year. Since my father passed away several years ago I try to find someone special in my life that I think needs a nice reminder that they are a good father. This year, I stuck with my mother's day theme and I'm sending one to my brother (I sent a card to my sister for mother's day, so figured my bro might like a father's day one). I didn't want to make it too sentimental, because, well that just isn't my brother, so I made it simple and to the point.

I used the twisted easel cut that I found on Mary's Cardz Tv awhile ago. I just love this design, and I hope my brother gets that he's supposed to stand it up!!!


Well I guess that is all for now. Hope you all have a great Wednesday, and I'll be seeing you all soon.
Tuesday, June 7, 2011
Super Giveaway going on right now!
Hey fellow paper crafters!!! There is an awesome (and I mean, OMG awesome) giveaway going on over at Chick-n-Scrap ! Jessica is celebrating reaching her 300th follower, and she is offering some major blog candy. Here is a look at what is going to be given away!
 Head on over to her blog for a chance to win, if you aren't a follower of her's yet, let her know that Mel from The Purple Giraffe sent ya over!!! This is a huge giveaway, and of course everyone wants to be in, and she has a bunch of ways for you to enter, so go on over and check it out!

Sunday, June 5, 2011
Bug Bites Chillin'
So as most of you know this weekend was the second weekend of BugBites Grillin' n Chillin' Bug Hop and I spent most of this weekend trying to come up with an awesome card to post for it. I had so much trouble deciding what to do that for awhile I didn't think I would have anything to enter. However, finally today, inspiration hit. I had to make a card for my SIL (yeap, another one), and her birthday lands on the first day of summer (same as my son's if you care to know... LOL). So I wanted to do something with a summer theme, so I pulled out my Paper Doll Dress-Up cart from Cricut. I love this cart, cuz there are so many different things you can do. I also love how you can make such cute cards for kids using their own imagination to inspire you!!! Anyway, I pulled out the booklet and found this really cute hulu skirt and top and of course there was a palm tree to go with it, so I was almost good to go.
 Of course I had to add my little critter, so a little lady bug joined my girl on the beach!!! I mean, I am cool with ladybugs joining me for some fun, some other bugs I could do without, so I figured my girl would not be too upset if I placed a ladybug on the beach with her!

The design of the card was inspired by Mary over at Cardz Tv ,which I have to say, I love her ideas, and she is just so sweet. I can imagine going to her house and having a nice cup of tea... kind of reminds me of my mom!!! The type of card was called the Z-fold, and it was super simple to put together. Check out her site to find out how to do it. Anyway, here is a few more shots of my card!!! All papers were from my scrap box, and I used a bunch of my pens. I also used some of my handy markers to color in the water and the palm tree as it was not a layered type cut in the book. Hope you enjoy it, and if you haven't already, check out BugBites before midnight tomorrow night to get your selection put in. Have a great evening!


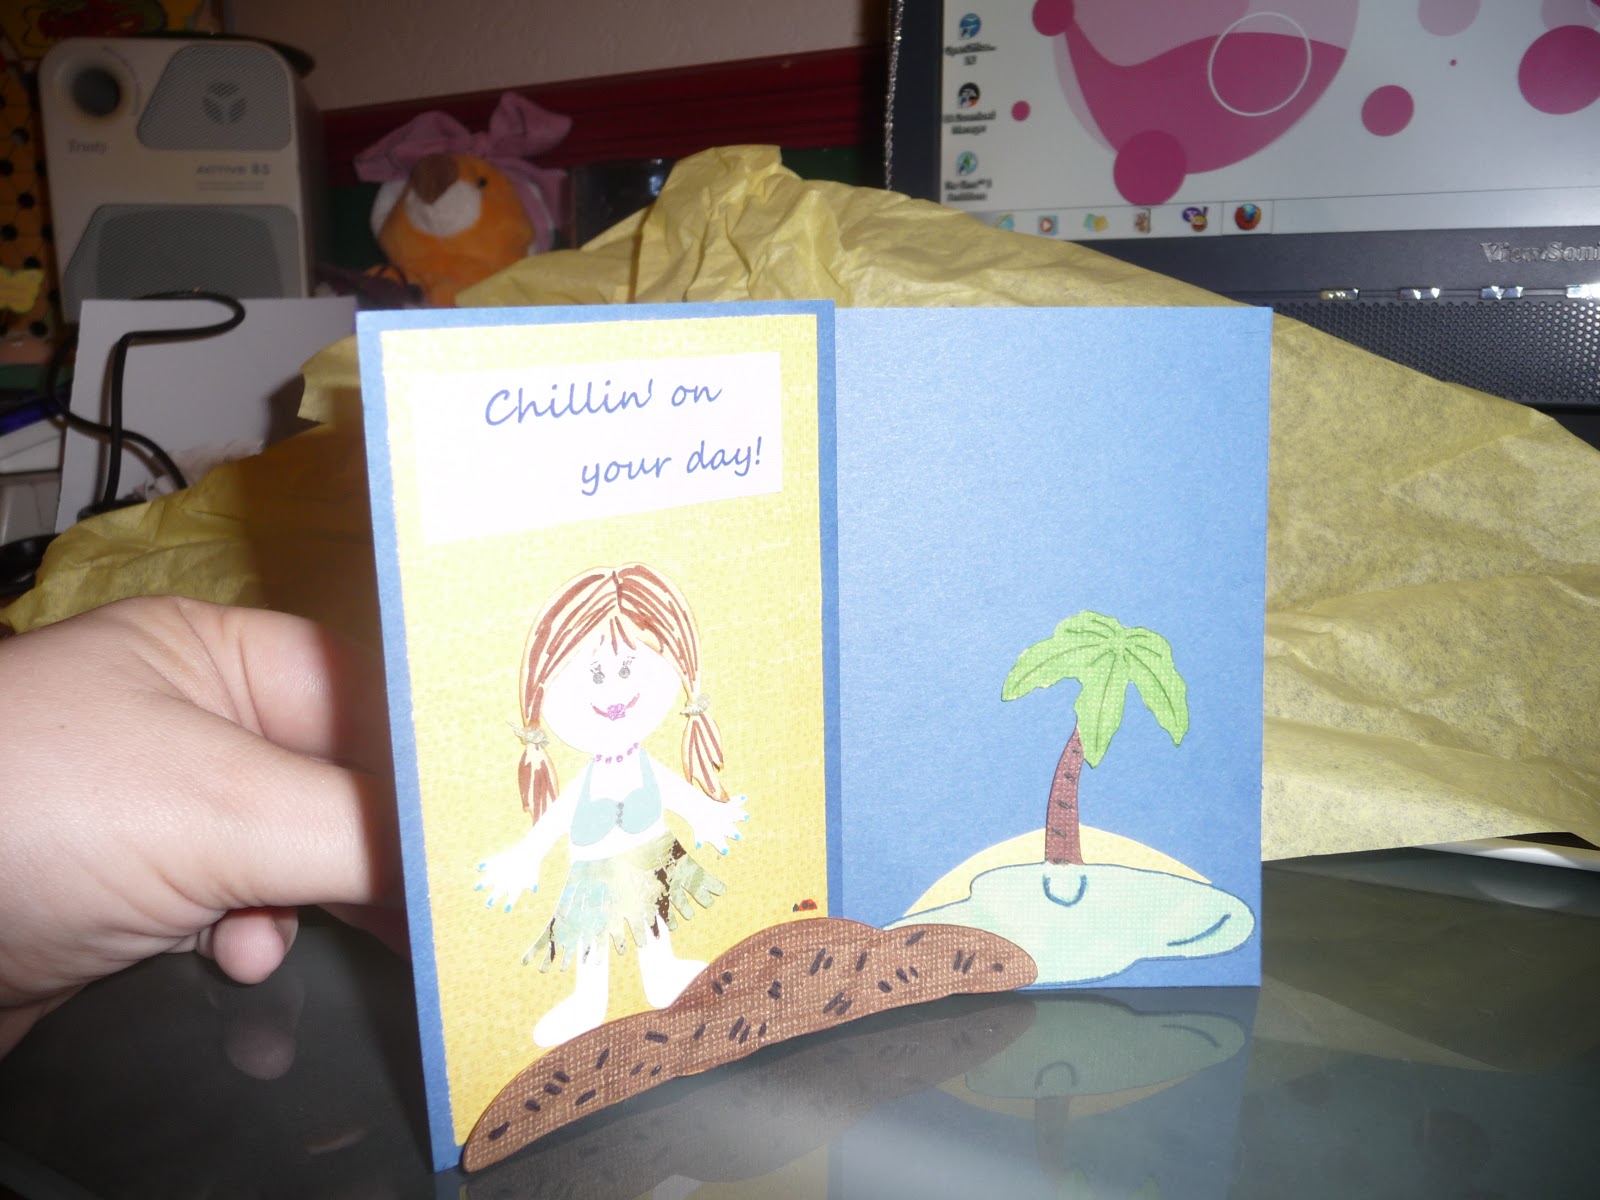

The design of the card was inspired by Mary over at Cardz Tv ,which I have to say, I love her ideas, and she is just so sweet. I can imagine going to her house and having a nice cup of tea... kind of reminds me of my mom!!! The type of card was called the Z-fold, and it was super simple to put together. Check out her site to find out how to do it. Anyway, here is a few more shots of my card!!! All papers were from my scrap box, and I used a bunch of my pens. I also used some of my handy markers to color in the water and the palm tree as it was not a layered type cut in the book. Hope you enjoy it, and if you haven't already, check out BugBites before midnight tomorrow night to get your selection put in. Have a great evening!


Friday, June 3, 2011
A Simply Cute B-day Card
So I started this afternoon out in one direction (trying my hand at an easel card) and ended up with something completely different (a card with no cricut image... for shame!)!!!
For a little while today I had a creative block, but then I got out of it when I pulled out my brand new pack of Crate Paper ~ Lillian Collection Kit. This kit is full of whimsical birds and swirls and all kinds of super cute papers to work with. So by taking a basic blue background and adding some wonderful colors to it, I came up with a super cute card to send to my best friend for her birthday.
 The base of the card is from my stash that I have, and then I layered it with some paper from the Lillian Collection Kit, for the flowery background. I added a curved sentiment, with the sticker letters that came with the kit, and a cute flower that I pushed the petals up so it would look a little more realistic. On the top I put a border that came with the kit, and weaved some ribbon that I had laying around through it. Then to emphasize the bird theme with the kit I added a cute little bird from the pop outs in the kit and placed it on a pop dot to give it a little more dimension.
 As you can see the paper comes with some glitter in it, so no need for any glitter glue today.
 For the curved sentiment I simply used a stylus I had laying around my desk and drew a curve on the paper free hand, then placed the letters on the curved portion.
I made the card using the measurements of a regular business size envelope, cuz I hate not having an envelope to go with it. True I could make my own, but sometimes I hate using the paper up for that.
I'm entering this card into the CAS-ual Friday's Challenge this week, where we were given a sketch as inspiration that had a curve and the wiggle border look on it. I really liked the sketch, how simple it was, and thought this would work perfectly for this card. I hope you like it!!
Check back later this weekend, as I'll be headed over to the Bug Hop on BugBites! Looking forward to all the great new ideas. See ya'll soon!
For a little while today I had a creative block, but then I got out of it when I pulled out my brand new pack of Crate Paper ~ Lillian Collection Kit. This kit is full of whimsical birds and swirls and all kinds of super cute papers to work with. So by taking a basic blue background and adding some wonderful colors to it, I came up with a super cute card to send to my best friend for her birthday.


I made the card using the measurements of a regular business size envelope, cuz I hate not having an envelope to go with it. True I could make my own, but sometimes I hate using the paper up for that.
I'm entering this card into the CAS-ual Friday's Challenge this week, where we were given a sketch as inspiration that had a curve and the wiggle border look on it. I really liked the sketch, how simple it was, and thought this would work perfectly for this card. I hope you like it!!
Check back later this weekend, as I'll be headed over to the Bug Hop on BugBites! Looking forward to all the great new ideas. See ya'll soon!
Thursday, June 2, 2011
A New Award!

There are a few rules that go with the "A Thing of Beauty Award", so I guess I better get on with that part.
Here are the rules for the A Thing of Beauty Award:
I must share 5 things about myself ( 1 of the listed items must be something about crafting) and then pass the award to 5 other blogs.
1.) I am designing a new craft room in my head, and saving up money to put it into effect (can't wait for that day!)
2.) When I'm not working, I am usually hitting the books to finish my bachelors (hopefully by October 2012)
3.) I never thought I could make cards, they always looked so complicated, but I'm so addicted now!
4) I love to shop
5.) When I'm not paper crafting, working, blogging, taking care of my boys, or doing school work, I love to read, books, magazines, text books (I know I'm a total dork now), I just love to pick up a book and read it.
I would like to pass this award to the following people:)
1)Melissa from Sunshine Honeybee
2)Jessica at Cricut After Dark
3)Peggy Sue from ICrea8Cards
4)Jessica at Chick-n-Scrap
5) Jazzy's Cards
Anyway, the blogs above have some really cute ideas, and I love checking them out! I hope you'll check them out too, and maybe you'll find a new favorite blog to follow.

This weekend is Barb's second Bug Hop the Chillin' team is going to have some awesome projects to share with you, and I can't wait to follow the hop trail to the end. So looking forward to being able to join in this weekend (last weekend was a bit hectic for me, getting back from PA, and dealing with all that fun stuff). Hope you'll join along. Check out Barb's Bugbites Page for more information on the Bug Hop for this weekend!
See you all soon.
Subscribe to:
Posts (Atom)